A few weeks ago we received an Insta360 Pro 2 360° video camera for testing purposes. In this article, we are looking at some of its features as well as present you with real-world footage. We will discuss our thoughts and findings in four very distinctly different filming situations (forest, bike ride, city night shoot and HDR) and hopefully, give you some information that will help you to form your own opinion of this very capable 360° video camera.
360° Video — Now and then
When we started filming 360° videos many years ago, the life of a 360° videographer was very different to what it is now. A 360° camera was a cobbled together bunch of individual GoPro’s that was half a step further from a prototype. Settings for each individual camera needed to be adjusted to the particular lighting situation while keeping in mind that the settings of each individual camera also needed to somehow match or play well with the settings of the other cameras. The rig needed to be synced by twisting it a few times or clapping your hands. And even then the results weren’t always beautiful, with blurry edges where two cameras overlapped or stark differences in exposure between bright and shadowy areas ruining the immersive feeling of the stitched footage. Along came the GoPro Omni which was still a bunch of GoPro’s stuck together in a cube, however, the main improvement was that now all cameras could be controlled from one master camera. While this had obvious advantages of not having to start each camera separately and change settings for each one of them, it also removed the ability to do just that – change the settings individually. This meant that now we couldn’t set the exposure of each camera individually, which was a pain in the neck because sometimes the front of the scene was in bright daylight while the back or another area of the scene was pointed towards the shadowy undergrowth of a forest. Regardless of these very different lighting situations, you could only put all cameras into the same setting, which more often than not created more problems than the convenience of controlling all cameras at once were worth it. The Omni also came with camera synchronisation that was built into the rig, so no more twisting the rig or clapping your hands was necessary – in theory, because the synchronisation did not always work as expected and there were still situations where one or more cameras were off by a few milliseconds. We have filmed with these rigs for many years and they were the best that was realistically available for anything smaller than a Hollywood production studio. Yet, while putting up with the shortcomings of these rigs and doing our best to compensated for their flaws, we longingly waited for a new breed of cameras that would address the massive pain points of this first generation of 360° cameras. And they came.
ZCam’s S1/Pro as well as Kandao’s Obsidian (R/S) and Insta360’s Pro 1 — as well as some others — were close on the heels of the Omni and in contrast to the Omni they were not individual cameras grouped together as one, they really were a dedicated one-piece 360° camera. However, this didn’t mean that they weren’t coming with their own set of problems. Awkward positioning of ethernet ports that required the battery to be removed so you were able to plug in the cable to change the camera settings (with a laptop and battery extension cable out in the field), or image quality that wasn’t so much better than the Omni’s as to justify a $7000 expense, made it really hard for us to justify this step. To us, this first generation of ‘true’ 360° cameras felt more like a cross-grade from the Omni rather than a real upgrade. Yes, they solved a lot of problems that the Omni had, however, they introduced their own set of issues or were simply too expensive for too little improvement. So you may understand our excitement when Insta360 announced their Pro 2 360° camera in August 2018.
Insta360 Pro 2
While we were excited, we were also hesitant because the Pro 1 wasn’t the most liked camera by our colleagues because of fan noise, occasionally corrupted video files and a few other things, however, the specs, features and sample footage of the Pro 2 looked too tempting to not take a closer look. So we went to Photokina to check out the Pro 2 face to face. The first impression was really good, everything worked as advertised. We could check the full 360° preview on a mobile phone/iPad, conveniently change the settings and even the plugin that allowed instant stitching in Adobe Premiere looked great (more on this later). It was very clear that we needed to look at this camera in more detail so we spoke with the staff at the Insta360 booth to discuss the possibility of a test unit. They were very understanding of our need to test the camera under our own conditions and a few months later they came through on their promise and sent us a Pro 2 so we could do our own tests.
First Impressions
When the unit arrived mid-December 2018, we received a very well put together package that came in its own pelican case where each piece had its place. Some people have complained about the excessive packaging (each cable has its own cardboard box), however, we find cardboard a lot better than plastic as it can be recycled more easily and breaks down eventually if lost in nature, unlike plastic which endangers wildlife and lies around for decades before it degrades. One thing that was superfluous, though, was the carry strap that was in the case. We could tell that none of the previous testers had actually taken it out of the wrapping. Just like us they probably deemed it to be completely unnecessary. It’s not like we would carry the Pro 2 around our neck or dangle it over our shoulder like a DSLR camera. So Insta360, if you read this post, maybe have a think about removing this accessory from the package. I don’t think many people will miss it. Apart from the pelican case with the camera in it, there was also a box with the FarSight transmitter and receiver. After unpacking everything we did the first test shoots at home and were very impressed with the painless workflow to get everything up and running. Things were reasonably well documented and the app and camera worked together flawlessly. After the first few tests at home, it was time to venture out into nature.
Test Shoot — Creek in Forest
As a first test, we decided to film a small creek on a sunny day in a winter forest (no snow but bare trees). The scene was challenging because while the sun was shining directly at the camera, the other side of the creek was in darkness with the sun peeking over the edge. So it’s a very high contrast situation with a shadowy area and the bright sun right above/below each other. We recorded with multiple settings (automatic, i-Log, 8k/60fps, 8k/30fps, 6k/60fps) and then went home to check the footage. For these tests, we used the Insta360 stitching software for two reasons. On the one hand side we wanted to see how well the software would actually stitch the footage and on the other hand, we wanted a quick turnaround to look at the footage before deciding whether a detailed stitch with a specialised stitching software (the now discontinued Autopano or Mistika VR) was worth the time and effort. Furthermore, to date, we have only stitched monoscopic footage here at Atmosphaeres so we wanted to leave it to the Insta360 stitcher to do the 3D stitching first, before looking at other options. The Insta360 stitching software was pretty self-explanatory and we used it to transfer the videos from the SD cards onto our computer as well as stitch the samples. First off, we looked at the 8k/60fps footage and were impressed by the crisp image quality — this was definitely an improvement over the Omni! Furthermore, the dynamic range is really good for a camera at this price point. On the not so good side, there was quite a bit of noise in the footage. The noise is more pronounced in the darker/shadowy/low-light areas of the image (e.g. foilage on the creek bank in the shadow) but we have also seen it in bright areas, like blue sky that is visible through the bare tree branches. So we checked the 30fps version of the same location and the noise was a lot less. It wasn’t completely gone but a lot less than in the 60fps recording. Sadly, the 30fps version got corrupted so we can only show you the 60fps version of this example. Later on, there will be samples of both, the 30fps and the 60fps versions. Note that all videos in this post, despite being filmed at 8K resolution, have been rendered at 4K resolution to make them easier to play back on more systems. All videos were exported with default settings from the Insta360 stitcher and no further processing has been performed. Without further ado here is the 60fps version of the first test shoot.
360 Video – Creek in Forest (60fps)
We have spoken to Insta360 about the noise in the 60fps footage and they told us that this is due to the shutter speed being lower and the iso being higher in 60fps mode. They promised that they will be looking into ways to reduce the noise via firmware. We haven’t had an indication, when this may happen, so we’ll have to wait and see. Also, while we would love to film in high-quality 8k 60fps, very few VR headsets are currently capable of playing back a video with a 60fps framerate, not even at 4k resolution. Furthermore, especially with the mostly non-moving nature and travel 360° footage that we shoot, 30fps still creates a very good feeling of immersion. So while we are hopeful that Insta360 will be working on reducing the rather large amount of noise in the 60fps footage, we think that reducing the small amount of noise in the 30fps footage would be the lower hanging fruit and would yield faster and easier rewards for a larger number of videographers, at least from our point of view and use case.
FarSight
As part of this first test shoot we also tried out the FarSight controller, which many may think is not really that necessary for nature videography, however, while it is true that this is not a mission-critical accessory, it certainly is a ‘nice-to-have’ option. Sometimes the next hiding spot is a couple of hundred meters away (e.g. Wineglass Bay in Tasmania with a beach that is a hundred meters wide) and if the recording can only be started on the camera itself or within the range of the built-in WiFi network of the camera, we may be recording up to 2 or 3 minutes of unnecessary footage until we have properly hidden behind a rock or some bushes. So in these situations, the FarSight would save us a tremendous amount of recording time, storage space and battery charge. Additionally, we would also be able to comfortably walk to our hiding spot and start the recording when the scene is ‘clean’ rather than running towards the hiding spot in order to keep the unnecessary recording time to a minimum. Furthermore, not only does the use of the FarSight save on storage space on the camera’s SD cards but it also greatly reduces the time to import/copy footage to our storage server as well as saves space there as well. So all in all, while we may not need the FarSight on every shoot, it is really good to have this option. Saying that it might be worth considering to make the FarSight an optional add-on so people who don’t really need it can get the camera at an even better price.
While we are on the topic of nice-to-have options, a special mention should be made about the display and menu system that is built into the camera. This is a feature we greatly appreciated on the Omni and have dearly missed on the ZCam S1 and Kandao Obsidian. To us, a menu and display on the camera itself is super useful and it shows that Insta360 have really thought about the professional 360 videographer when they developed this camera. Granted, the Pro 2 control display does not allow to change all of the camera settings via the menu, however, it is really good to have this option as a backup for when the battery of the mobile phone (which we usually use for changing settings) is depleted.
Test Shoot Bike Ride — FlowState Stabilisation
In the second test we looked at the much-touted FlowState stabilisation. To properly put this camera stabilisation algorithm through its paces we got on our e-bikes and rode into the forest and onto some bumpy, yet not overly challenging, gravel roads. We mounted the Pro 2 onto a regular monopod which was held in place by our regular camera backpack. While this was not a dedicated setup for this kind of recording, it allowed us to get a good initial impression of the quality of the stabilisation. When we came home and put the footage through the Insta360 stitcher, all we had to do was select the FlowState checkbox for the export and that was pretty much it. To make it short, the results are simply amazing and from our point of view, the FlowState algorithm makes gimbals largely unnecessary. There are still a few small shifts in the scene, however, 90-95% of the stabilisation are really solid. So congratulations to Insta360 for this great feature.
360 Video – Bike Ride in Forest (Stabilised)
Test Shoot Christmas Markets — Low-Light Performance
Another type of footage that we often shoot are city scenes. Often nighttime panoramas look particularly stunning, however, unlike 360° nighttime photos, 360° nighttime videos can often look rather unimpressive because of the high level of noise, especially in the really dark areas of the scenes. Because it was the festive season when we tested the camera, we decided to test the low-light performance of the Pro 2 at a nearby Christmas market. Again, we filmed in 8k/60fps and 8k/30fps. We tested the Pro 2’s standard/automatic mode as well as the i-Log mode and manual ISO settings. Unsurprisingly, i-Log mode and manual ISO settings resulted in much better image quality than the automatic settings. The highlights are a lot less blown-out and overall dynamic range comes out a lot more balanced than with the automatic setting. What did surprise us, though, was that while the 60fps recording showed quite a lot of noise, the noise in the dark areas of the image was actually pretty low in the 30fps mode. We would have no issue to present the 8k/30fps footage to our clients and partners. Below are the 30fps and 60fps versions so you can take a look yourself.
360 Video – Christmas Markets at Night (60fps)
360 Video – Christmas Markets at Night (30fps)
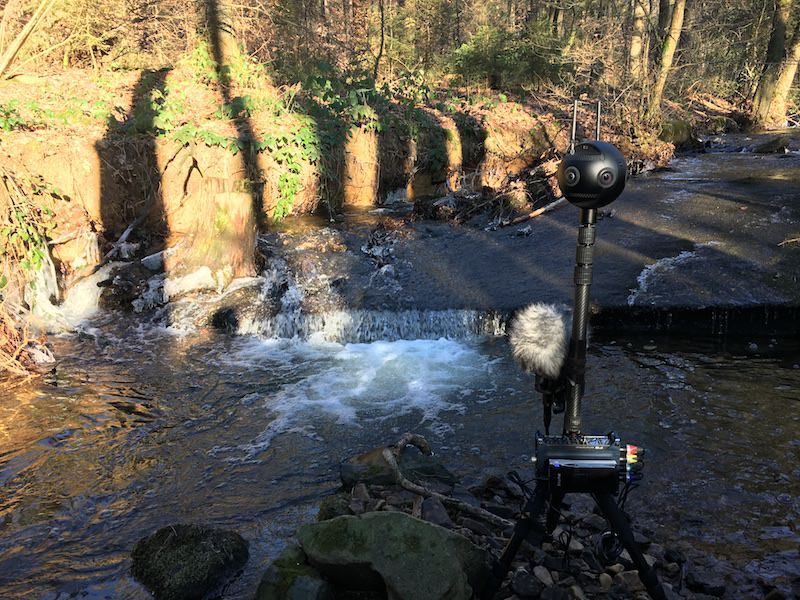
Test Shoot Nature Filming 2 – HDR
Towards the end of the testing period the sky cleared up again and we could test the newly introduced HDR mode (previously only available in beta mode). The below photo shows the scene and the video shows the recording of the camera. In our view, the HDR mode really does a good job to balance out the bright and shadowy areas in this challenging situation. Finally, this is a camera where we do not need to set different exposures for different sensors/areas of the scene. Following is a sample of the un-processed footage directly from the Insta360 stitcher.
360 Video Forest Creek (Scene)
360 Video – Forest Creek (30fps)
With this particular shot, we have also taken a little more time because it fits into our catalogue of 360 stock videos. This means that during the shoot we covered the sun with a couple of branches to avoid the light streaks that typically occur with pretty much every camera in these lighting situations. If you look at the sun in this and the previous video you will see the difference that this little trick makes. Once home, we stitched the video in Autopano in order to get the best possible stitch quality (more on this in the next paragraph). In the next step, we removed the tripod, replaced the camera audio with spatial audio recorded on a Røde NT-SF1 ambisonic microphone and a Zoom F8 field recorder and colour-graded and cleaned up the clip before exporting it. Following is the final video (with stereo audio).
360 Video – Forest Creek (Final Outcome)
If you are interested in licensing the above forest creek clip or other premium 360 stock video footage for your own projects you are welcome to take a look at our library of hundreds of royalty-free 360 stock videos at Atmosphaeres.com
Insta360 Stitcher vs. Autopano
As mentioned earlier, the Pro 2 comes with its own stitching software that can be downloaded with a valid serial number and it is a great place to get started quickly. Sure, the render speed is not the fastest but it is a really good tool to get an easy and fast (just render when you’re doing something else) preview of each scene. It is not suited (or intended, I believe) for a high-quality stitch. That’s what specialised stitching software like Mistika VR or Autopano are for. These tools offer a lot more functionality as well as the ability to fine-tune and fix problematic areas. Unfortunately, Kolor’s Autopano has been discontinued by GoPro, so we won’t be able to continue to use it forever, however, if you have an existing license of Autopano then you can still use this to create your high-quality stitch of the Pro 2 footage. While there are a few minor inconveniences, the final stitch is still perfect. If you don’t have an Autopano license, go straight to Mistika VR for your high-quality stitches.
360° 3D
We have long held back on filming stereoscopic 3D 360° video clips because all examples that we had seen previously were giving us eye strain and headaches when viewing them in a VR headset. We have also had many people ask us about regular 2D 360 videos whether they were actually 3D. This indicates that if people were uncertain of whether a video is 3D or not, it means that they did not really notice if a video was ‘flat 2D’. We have also long been believers that well done, high-quality 2D videos allow for a much better experience of a scene than mediocre 3D that just does not look right and creates discomfort for the viewer. So instead of doing 3D 360 just for the sake of doing it, we have focused our activities on creating the best possible 2D 360 videos that draw the viewer into the scene without breaking the immersion because of stitch artifacts or poorly implemented 3D for that matter. We had also not seen much demand for 3D 360 videos from our clients, colleagues and partners, thus, there did not seem to be much of a market that would justify the use of this format. Lately, however, we have seen a little more interest for 3D 360 video footage, so it was very convenient that the Pro 2 offered the option to film in this format and I must say that I was very positively surprised. Filming is almost the same as for flat 2D and the post-production of a review sample was very easy with the Insta360 stitcher. Furthermore, the resulting 3D 360 video looked very good and comfortable in a VR headset. So from our point of view, 3D 360 video has finally achieved a stage of maturity where it is ready for release to the general public/end-user. It still remains to be seen, though, how much effort is involved in creating a high-quality stitch of the 3D footage in Mistika VR or Autopano, especially when it comes to removing the tripod and other unwanted objects from the scene. Also, we will hold back from jumping into this format head first until we see significant demand for 3D 360. This is because one of the biggest inhibitors of 3D 360 is that the videos result in much larger file sizes because with this format, the resolution is not 7680×3840 (or 4096×2048) but 7680×7680 (or 4096×4096) to accommodate both video streams for the left and right eye. Furthermore, the 1:1 ratio video files put a higher demand on the VR headset playback and streaming performance because the headsets need to process double the pixels than before and streaming servers need to deliver double the file size as compared to a 2D 360 video. So it remains to be seen if the market and the delivery technology (headsets and streaming) are ready for 3D 360 videos. Saying that, it will be nice to film in a format that allows the creation of flat 2D 360 video now and offers the option of turning that footage into 3D at a later time, as well.
Fan Noise
Many Pro 1 and Pro 2 users complain about the fan noise and while it is a bit annoying, we did not find it to be a problem for 95% of our shoots. It should be clarified that the fan is only on during stand-by while you’re changing settings, checking the preview etc. As soon as the recording button is pressed, the fan stops whirring and the camera is silent. Only after 15 minutes of straight recording does the fan kick back in to make sure that the camera is properly cooled. While this may be an issue for some users who film long scenes, it is not much of a problem for us. We mostly film a few minutes of each scene, in fact, the longest take that we have filmed to date was 15 minutes and that was including us still being in the shot and walking away to hide behind some bushes.
Further Observations
There are a few things that we came across during our tests that may just be isolated issues that we experienced, hence, we don’t want to give them too much emphasis until others have shared their experiences.
Plugin Issues?
When we tested the Insta360 Premiere plugin we experienced an issue that could really well be isolated to our computer, however, we want to mention it here so that others who experience the same thing may find a clue as to why this may be happening. We work on our computers every day and we have a pretty good workflow by now, however, for a few weeks, Adobe Premiere was not running very well on one of our computers. We updated to the newest graphics card drivers, re-installed Premiere, updated to a beta version of Premiere (and back to the latest stable version because the beta version was running even less good), yet, Premiere was still running somewhat sluggish. Clicking on the File menu meant that we had to wait for 2 seconds until it would reveal the dropdown menu and random things, like masks that were not displayed properly on the screen kept happening. Also, upon exiting Premiere, the software would throw an ‘uncaught exception’ error from a script it was running. We didn’t give much about this at first because those are just things that Premiere sometimes does or it could be the new graphics driver that was causing at least the issue of the masks not working as expected. Sometimes, with the next update these bugs are gone, however, we couldn’t wait for that, especially since the beta version of the next Premiere update did not resolve the issue. Hence, we searched online for the error message and low and behold there was a forum post by a fellow 360° videographer who had the same error message and traced it down to the Insta360 plugin script. It might be a coincidence, however, after de-installing the Insta360 stitcher and plugin from our computer, all the issues in Premiere were gone and we could work as efficiently as before. What surprises me most with this is that we only tested the Insta360 plugin in Premiere once and then always used the standalone version of the stitcher. So the script was not used in any of our projects, however, it seems like it was still running in the background whenever we started Premiere. Again, this may be an isolated coincidence, however, the fact is that our Premiere installation runs a lot better since we de-installed the plugin. To us, it is not going to be an issue in the future because we will not use a plugin to stitch in Premiere, because we need the best possible stitching quality, which at this stage can only be achieved by dedicated 360° stitching software like Mistika VR and Autopano.
Power Button
With all the well-put-togetherness of the Pro 2 (it really feels like a pretty mature, thought-through pro-sumer product), one thing that we found frustrating was that there was no way to lock the on/off button and prevent the camera from accidentally turning on in the backpack. On two occasions we arrived on the scene and the battery was completely drained. Luckily, we weren’t too far from home so we could re-charge relatively quickly, however, in order to avoid this from happening again we ended up pulling the battery out of the camera during transport. So Insta360, if you are reading this, please have a think about ways to prevent the camera from turning on accidentally. Not only is it frustrating to arrive on set with an empty battery, I do also think that it is not very good if the camera is accidentally turned on in a tightly packed backpack. Not even the built-in fan will be able to counter the overheating that will take place eventually.
Summary
Overall the image quality of the Insta360 Pro 2 is really good. It is definitely sharper than the GoPro Omni at the same 8k resolution and the colours are rich and balanced with a nice dynamic range. Some colleagues have complained that the Pro 2 is missing the feature to attach an external SSD and we certainly second this motion because the ability to directly record to an SSD will save a lot of time when transferring the videos to a computer. It would also open up an option to record into uncompressed formats, such as Cineform or ProRes, maybe even at (dare I say it?) 10-bit colour-depth. There are still some rather pronounced noise artifacts in the 60fps recordings which are less but still visible in the 30fps recordings, however, Insta360 have promised to look into this. And going from the comments that we’ve seen in a number of forums, Insta360 do actually listen to feedback and address as many of the pain points as possible. So we’re hopeful that the noise issue will be improved in one of the next firmware updates.
If it were for any one of the individual upgrades or new features, the Pro 2 may still seem like a cross-grade to some (especially those already owning a Kandao Obsidian or ZCam S1/Pro), however, when we look at all the improvements as one package, the Insta360 Pro 2 is clearly a winner.
Disclaimer
We would like to thank Insta360 and their very responsive team for allowing us to test the Pro 2 in real-world situations under the conditions that we normally shoot in. We have not been paid by Insta360 or anyone else for this post so this is a completely independent review.

 RSS - Posts
Tony Hernandez
Excellent review. Thanks Atmosphaeres team. Just ordered mine.
Eric Fassbender
Hi Tony, I’m glad that the footage and our thoughts could help with your decision 🙂
Jimmy Giliberti
Thanks for the great writeup ! I also recently had time with this camera. Good observation on tools. I’m hoping I’m the one whose post you found on the forums about the Insta360Pro Premiere plugin. It would make me feel good that someone else didn’t have to pull their hair out figuring out what the problem was….
Eric Fassbender
Hey Jimmy, that might well be the case. I tried to look it up but I have too many reddit URL’s in my history to be sure. Either way, I have also already received note from another colleague who found that the plugin was the cause of his Premiere issues. So we’re helping one colleague at a time 🙂 What gets me though is that a plugin is even capable of causing such issues especially when it’s not even being used. So it’s actually a problem of Premiere. The host software should only run a plugin/script when it is being used and sandbox it otherwise. Very strange this one.
Igor
Hi
I recently heard that on the Insta 360 pro 2 the fan can be turned off completely in the app. I am not talking about 15 minutes. I am talking about turning it off permanently. Can somebody advise if this is possible and how to do it.
Thanks
Igor
Eric Fassbender
Hi Igor, sadly the fan cannot be turned off completely, only for those 15 minutes that you mention.